


-
T16 - Protection
T16 - PROTECTION TOUTE RESSEMBLANCE AVEC UN AUTRE TUTORIEL
SERAIT UN PUR HASARD


Filtres Utilisés
Unlimited>&<BKg Kaléidoscope
Unlimited>Factory F>Instant Tile
Carolaine and Sensibility
Mehdi>Kaléidoscope

Filtres de Renée


Vous avez dans ce matériel
1 calque Alpha
1 palette de couleurs
1 tube Tête fendue
1 paysage
1 texte
Mon Filigrane

Ouvrir Alpha-T16
Fenêtre>Dupliquer>Fermer l’original et travailler sur la copie
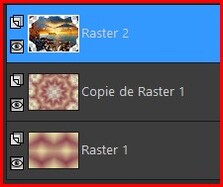
Qui devient Raster 1
1/
Faire un dégradé linéaire Premier Plan A 25/ R 4
Remplir le calque Alpha de ce dégradé
Unlimited > <BKg Kaléidoscope > 4QFlip UpperL

2/
Calque > Dupliquer
Images > Rotation libre D90
Calques > Propriétés > Ecran / Opacité 50
Calques > Fusionner le calque du dessous
3/
Effets > Modules Externes > Carolaine & Sensibililty > CS-LDots > 50/3/2
Effets d’image > Mosaïque sans jointure > Angle/Horizontal/0/50

Sélections > Charger une sélection Canal Alpha > Sélection #1-T16
4/
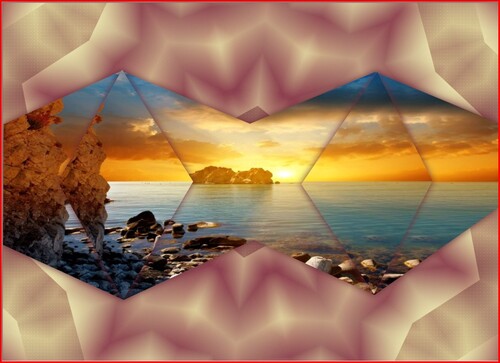
Ouvrir « Paysage T16 »
Calques > Nouveau calque Raster
Copier/Coller dans la sélection

5/
Sélections > Charger une sélection Canal Alpha > Sélection #2-T16
Calques > Nouveau calque Raster
Coller dans la sélection « paysage T16 » en mémoire
Calques > Réorganiser > Déplacer vers le bas
Effets > OP>0/0/100/20 #692736

6/
Se placer sur le Raster 2
Effets > OP>0/0/100/20 #692736
Calques > Fusionner avec le calque du dessous
7/
Se placer sur le Raster1
Calques > Dupliquer
Et sur la copie du Raster 1
Effets > Modules Externes > Mehdi > Kaléidoscope 2.1 > miror 10/-52/2.5 Random 106/10/68
8/
Sélections > Charger une sélection Canal Alpha > Sélection #3-T16
Calques > Nouveau calque Raster
Coller dans la sélection « paysage T16 » en mémoire
Effets > OP>0/0/100/20 #692736

9/
Se placer sur le Raster 3
Calques > Fusionner le calque du dessous
10/
Sur le calque Raster 2 > Calques > Propriétés > luminance H
Calques > Fusionner les calques visibles
11/
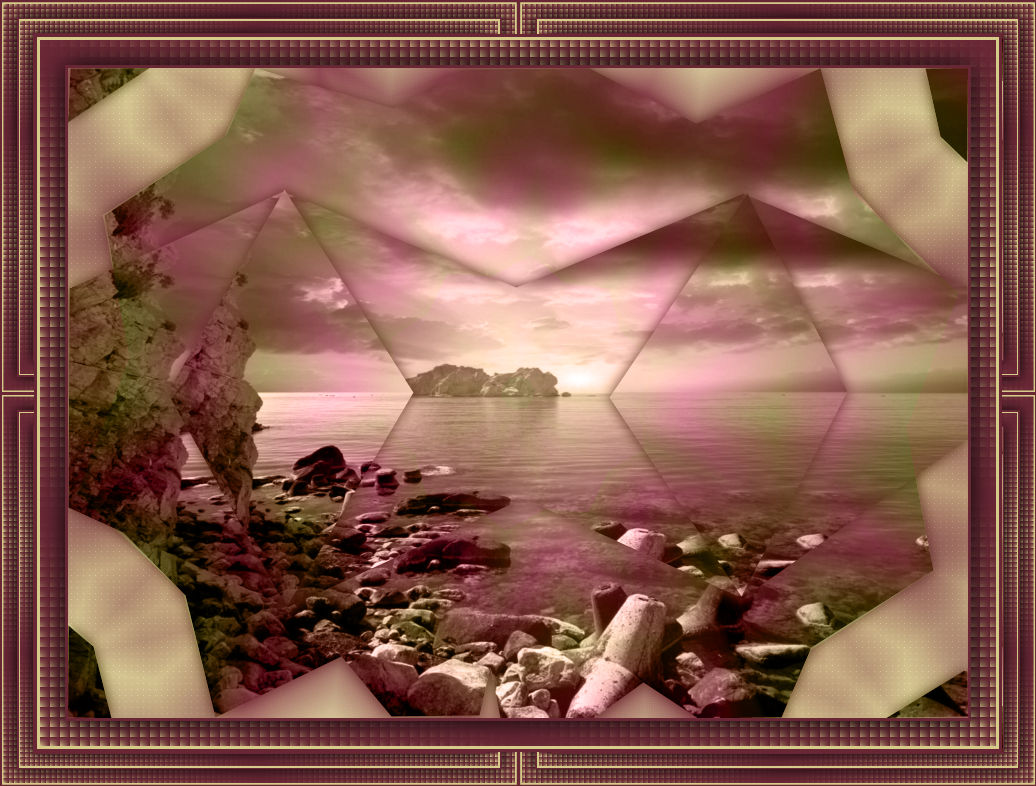
Images > Ajouter des bordures symétriques
3 #692736
25 #ffffff
Sélectionner avec la baguette magique
Remplir du dégradé du départ
Effets > Textures > Stores 10/100 #692736 Cocher Horizontal Décocher Lumière Haut/Gauche
Refaire Effet textures/Stores 10/100 #692736 Décocher Horizontale et Cocher Lumière Haut/Gauche
Sélections > inverser
Effets > OP>0/0/100/40 #000000

12/
Images > Ajouter des bordures symétriques
3 #d7cb8b
3 #692736
Edition > copier
13/
Sélections > Sélectionner Tout
Images > Ajouter des bordures symétriques
34 #ffffff
Sélections > Inverser
Edition > Coller dans la sélection
Effets > Unlimited > Factory F > Instant Tile 119/160

14/
Ouvrir le tube T16-Tête fendue
Copier/Coller comme nouveau calque
Images > Redimensionner à 120%
Placer K 401/165
Désélectionner avec M
Réglages > Netteté/Netteté
Effets > OP> en mémoire
15/
Ouvrir le texte T16-Texte
Copier/Coller comme nouveau calque
Placer K 88/91
Désélectionner avec M
Réglages > Netteté/Netteté
16/
Apposer votre signature et mettre mon Filigrane joint dans le kit Matériel
Calques > Fusionner Tous
Images > Redimensionner à 800 pixels ou à votre convenance
Réglages > Netteté/Masque Flou 2/30/2 décocher luminance uniquement
Merci d’avoir fait mon tuto
Et j’espère que vous avez pris du plaisir
à le réaliser.
Fait le 09/03/2022
Vous pouvez m'envoyer vos créations et variantes
shawnee.lootah@gmail.com
ou
Sur les groupes "Les gentils Coquelicots"
et "Graphisme Evasion"

-
Commentaires
1PhyllisMardi 18 Juin à 11:40Wonderful blog! I found it while browsing on Yahoo News. Do you have any tips on how to get listed in Yahoo News? I've been trying for a while but I never seem to get there! ThanksRépondreHello there, I discovered your blog by way of Google at the same time as looking for a comparable topic, your web site got here up, it appears to be like great. I have bookmarked it in my google bookmarks. Hi there, simply turned into aware of your blog via Google, and found that it's really informative. I am going to be careful for brussels. I will be grateful if you happen to continue this in future. Numerous people will probably be benefited out of your writing. Cheers!We are a bunch of volunteers and opening a new scheme in our community. Your web site provided us with valuable info to work on. You have done an impressive job and our entire community shall be grateful to you.Hello! I'm at work surfing around your blog from my new iphone 4! Just wanted to say I love reading your blog and look forward to all your posts! Carry on the great work!I all the time used to read article in news papers but now as I am a user of web therefore from now I am using net for articles or reviews, thanks to web.Excellent article! We are linking to this great post on our site. Keep up the good writing. Suivre le flux RSS des commentaires
 Ajouter un commentaire
-
-

Tous mes tutos en image
-

-

-

-

Italien - Pinuccia


ne traduit plus

**********
Espagnol - Evalynda
ne traduit plus

Portugais - Vera Mendés
ne traduit plus


Néerlandais - Anja
ne traduit plus

-

-
Mes tutoriels et tags sont protégés ainsi que mes textes

00075230-2
Les images utilisées appartiennent à leur auteur et proviennent d'internet.
Si l'une d'entre elles vous appartenez, faites le moi savoir et si c'est votre choix, je la retirerai ou je mettrais un lien vers votre site ou blog.
Tout le contenu de mon blog est strictement INTERDIT à la reproduction pour des buts commerciaux.


